How do I winterize my sprinkler system?
All Lawn Sprinkling systems are required to be winterized to prevent freezing damage, be sure to check if your system is an Automatic Drain System or is required to be blown out.
Lawn sprinkling tips for winterizing are for full automatic drain systems only. Not all systems are full automatic drain systems. Please check your type of system before attempting to winterize your lawn sprinkling system.
|
STEP #1 |
Go to the basement and close the main shut off valve to the sprinkler system. |
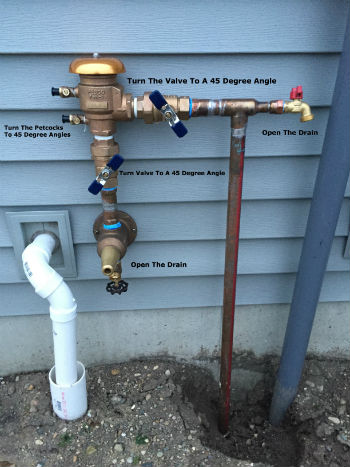
| STEP #2 | Hang a bucket on the drain back valve and open it part way (this will start draining water from the PVB (Vacuum Breaker)). |
| STEP #3 | Go to the PVB and open the 2 small ball valves (Petcocks) on the side of the PVB with a screw driver and set them to a 45 degree position (this will allow air into the piping and compete the draining process). |
| STEP #4 | Turn the handles of the PVB, generally 2 large ball valves with blue or red handles to a 45 degree position to complete the winterizing. |
| STEP #5 | The drain back valve in the basement can remain open all winter. Should water continue to drip from this valve during the winter, the main shut off valve is leaking and should be replaced by a plumber to avoid freeze damage to your sprinkler system. |
| STEP #6 | NOTE: If you have a manual drain in the lowest part in your system it needs to be opened, and left open for the winter season. The manual drain will then need to be closed during Spring turn-on. |

How do I turn on my sprinkler system?
|
STEP #1 |
Go to the Pressure Vacuum Breaker (PVB) located outside the house. |
|
STEP #2 |
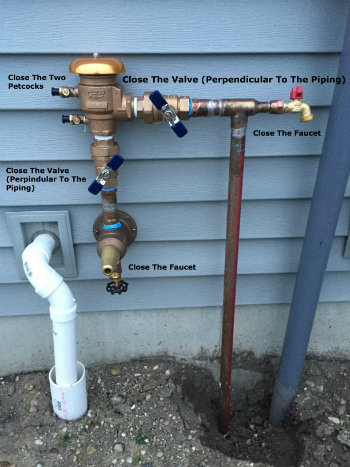
Close the 2 small ball valves on the side of the PVB using a straight blade screw driver (the slots will be in an up and down position when closed.) |
|
STEP #3 |
Close the 2 large ball valve (blue handles) on the PVB (the handles will be crosswise to the valve when closed.) |
|
STEP #4 |
Go to the basement and close the drain back valve. |
|
STEP #5 |
Open the sprinkler shut off valve in the basement. |
|
STEP #6 |
Go to the PVB and open the inlet ball valve (this is the lowest valve on the PVB with a blue handle). You will hear a “pop” as the PVB seals shut (some water may come out of the top of the PVB at this point – this is normal). |
|
STEP #7 |
Open the discharge ball valve slowly to a half open position (this is the upper most ball valve with a blue handle on the PVB). This allows the sprinkler main line to fill slowly while keeping pressure in the PVB. After the main line has filled, the valve can be opened full (the handle will be parallel with the ground). You can now check the sprinkler system and be ready for watering this season! |

How do I adjust my Rain Bird sprinkler heads?
|
STEP #1 |
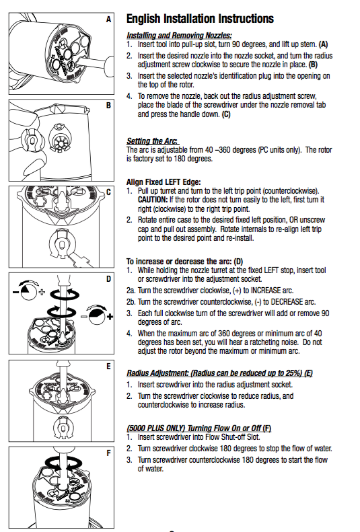
Insert tool into pull-up slot, turn 90 degrees, and lift up stem. (A) |
|
STEP #2 |
Insert the desired nozzle into the nozzle socket, and turn the radius adjustment screw clockwise to secure the nozzle in place. (B) |
|
STEP #3 |
Insert the selected nozzle’s identification plug into the opening on the top of the rotor. |
|
STEP #4 |
To remove the nozzle, first back out the radius adjustment screw. With a needle nose plier, grasp post under nozzle opening. Remove nozzle. |

Note: To lift up stem, insert the tool, or a bladed screwdriver into the slot on the side of the turret cap.
Setting the Arc
The arc is adjustable from 40-360 degrees (PC units only). The rotor is factory set to 180 degrees.
Align Fixed Left Edge:
|
STEP #1 |
Pull up turret and turn to the left trip point (counterclockwise). CAUTION: If the rotor does not turn easily to the left, first turn it right (clockwise) to the right trip point. |
|
STEP #2 |
Next, turn the turret until the arrow points in the direction you want t set the left edge to. |
To Increase the Arc: (D)
|
STEP #1 |
While holding the nozzle turret at the fixed LEFT stop, insert tool or screwdriver into the adjustment socket. |
|
STEP #2 |
Turn the screwdriver clockwise, (+) to INCREASE arc. |
|
STEP #3 |
Each full clockwise turn of the screwdriver will add 90 degrees of arc. |
|
STEP #4 |
When the maximum arc of 360 degrees has been set, you will hear a ratcheting noise. Do not adjust the rotor beyond the maximum arc. |
To Decreases the Arc: (D)
|
STEP #1 |
While holding the nozzle turret at the fixed LEFT stop, insert tool or screwdriver into the adjustment socket. |
|
STEP #2 |
Turn the screwdriver counterclockwise, (-) to DECREASE arc. |
|
STEP #3 |
Each full counterclockwise turn of the screwdriver will remove 90 degrees of arc. |
|
STEP #4 |
When the minimum arc of 40 degrees has been set, you will hear a ratcheting noise. Do not adjust the rotor beyond the minimum arc. |
|
STEP #1 |
Insert tool or screwdriver into the radius adjustment socket. (E) |
|
STEP #2 |
Turn the screwdriver clockwise to reduce radius, and counterclockwise to increase radius |
How do I adjust my ESP and ESP-ME Modular Controller?
Please view this video for information how to adjust your ESP-Me Modular Controller
How do I maintain my irrigation system?
ADJUST YOUR CONTROLLER BASED ON THE WEATHER
The key to efficient irrigation is to adjust watering schedules frequently during the summer months. If you set your automatic controller in the Spring and let it run all season, you’re wasting a lot of water that could be hurting your plants and costing you money. Many modern controllers allow you to easily adjust your watering schedule based on the weather, or you can install a Weather Based Controller that adjusts the schedule for you.
Watering schedules should be based on the Evapotranspiration (ET) rate for the West Michigan area, the combination of evaporation and transpiration. Local ET rates are calculated with weather station data, which includes temperature, humidity, wind, and solar radiation.
ET indicates how much water needs to be applied to plants to stay healthy. Since plants use more water when the days are longest, watering schedules that gradually increase into July and gradually decrease into September can increase plant health.
Use the current ET data for the Grand Rapids area to adjust your water schedule with the “Seasonal Adjust” or “Water Budget” feature found on many controllers.
ADJUST YOUR IRRIGATION CONTROLLER REGULARLY
Frequently adjust your irrigation controller runtimes during the season.
Set your controller to irrigate at night or before 9:00 AM to reduce evaporation.
Watch for water run-off of irrigated areas. If run-off occurs soon after watering begins, use the “Cycle & Soak” feature on your controller or set multiple start times for each zone to allow the water to soak in after each “cycle.”.
The use of flow control at the valve or use pressure-regulating heads if you have misting or overspray. If all zones have excessive pressure, a pressure-regulating valve can be installed at the point of connection within the home. The average sprinkler heads does not need more than 45 pounds per square inch of water pressure.
Reduce watering of established shrubs and landscape areas. Most landscape areas, once established, do not need supplemental water.
USE IRRIGATION PRODUCTS THAT SAVE WATER
Install a Weather Based Controller that automatically adjusts the watering schedule to reflect actual environmental conditions. These controllers can reduce sprinkler water use by up to 50% while actually improving plant health.
Using match precipitation in each zone allows you to apply equal amounts of water throughout the zone. Spray heads and rotors have different precipitation rates, so without match precipitation some areas get more water than others.
Use check valves to eliminate low-head drainage. If heads leak after the zone has completed its cycle, the system is wasting water. Heads with built in check-valves keep the water from draining from the pipe.
Ask your irrigation contractor to make recommendations for upgrades that will save you water and money.
REGULARY MAINTAIN YOUR IRRIGATION SYSTEM
Have your sprinkler system tuned-up by Schepers’ at the start of every watering season. Observe your sprinkler system running at least once a month to look for broken heads, leaks, plants blocking heads, and other water wasting problems.
Look for suspicious spots in your landscape that are much greener or consistently wet and muddy. Underground leaks can be difficult to identify and may need to be located by a trained service technician.
By using the latest in advanced irrigation control technology, adjusting your schedule regularly and properly maintaining your sprinkler system, you will help ensure the health of your landscape while conserving water and saving money.
How do I adjust the settings on my Iron Guardian?
Changing the Regen frequency
Regen is typically every-day, to change that (at the clock screen) hit the up arrow and the next button for 1 second, hit next button one more time to go past adjusting hardness, and use the up and down arrows to set the Regen for every 1,2, 3… days.
Changing the time Regen happens
Regen is typically at mid-night however to change that (at the clock screen) hit the up arrow and the next button for 1 second, hit next button one more time to go past adjusting hardness and again to go past Regen amount, finally we come to set time for Regen and use the up and down arrows to adjust the time.


